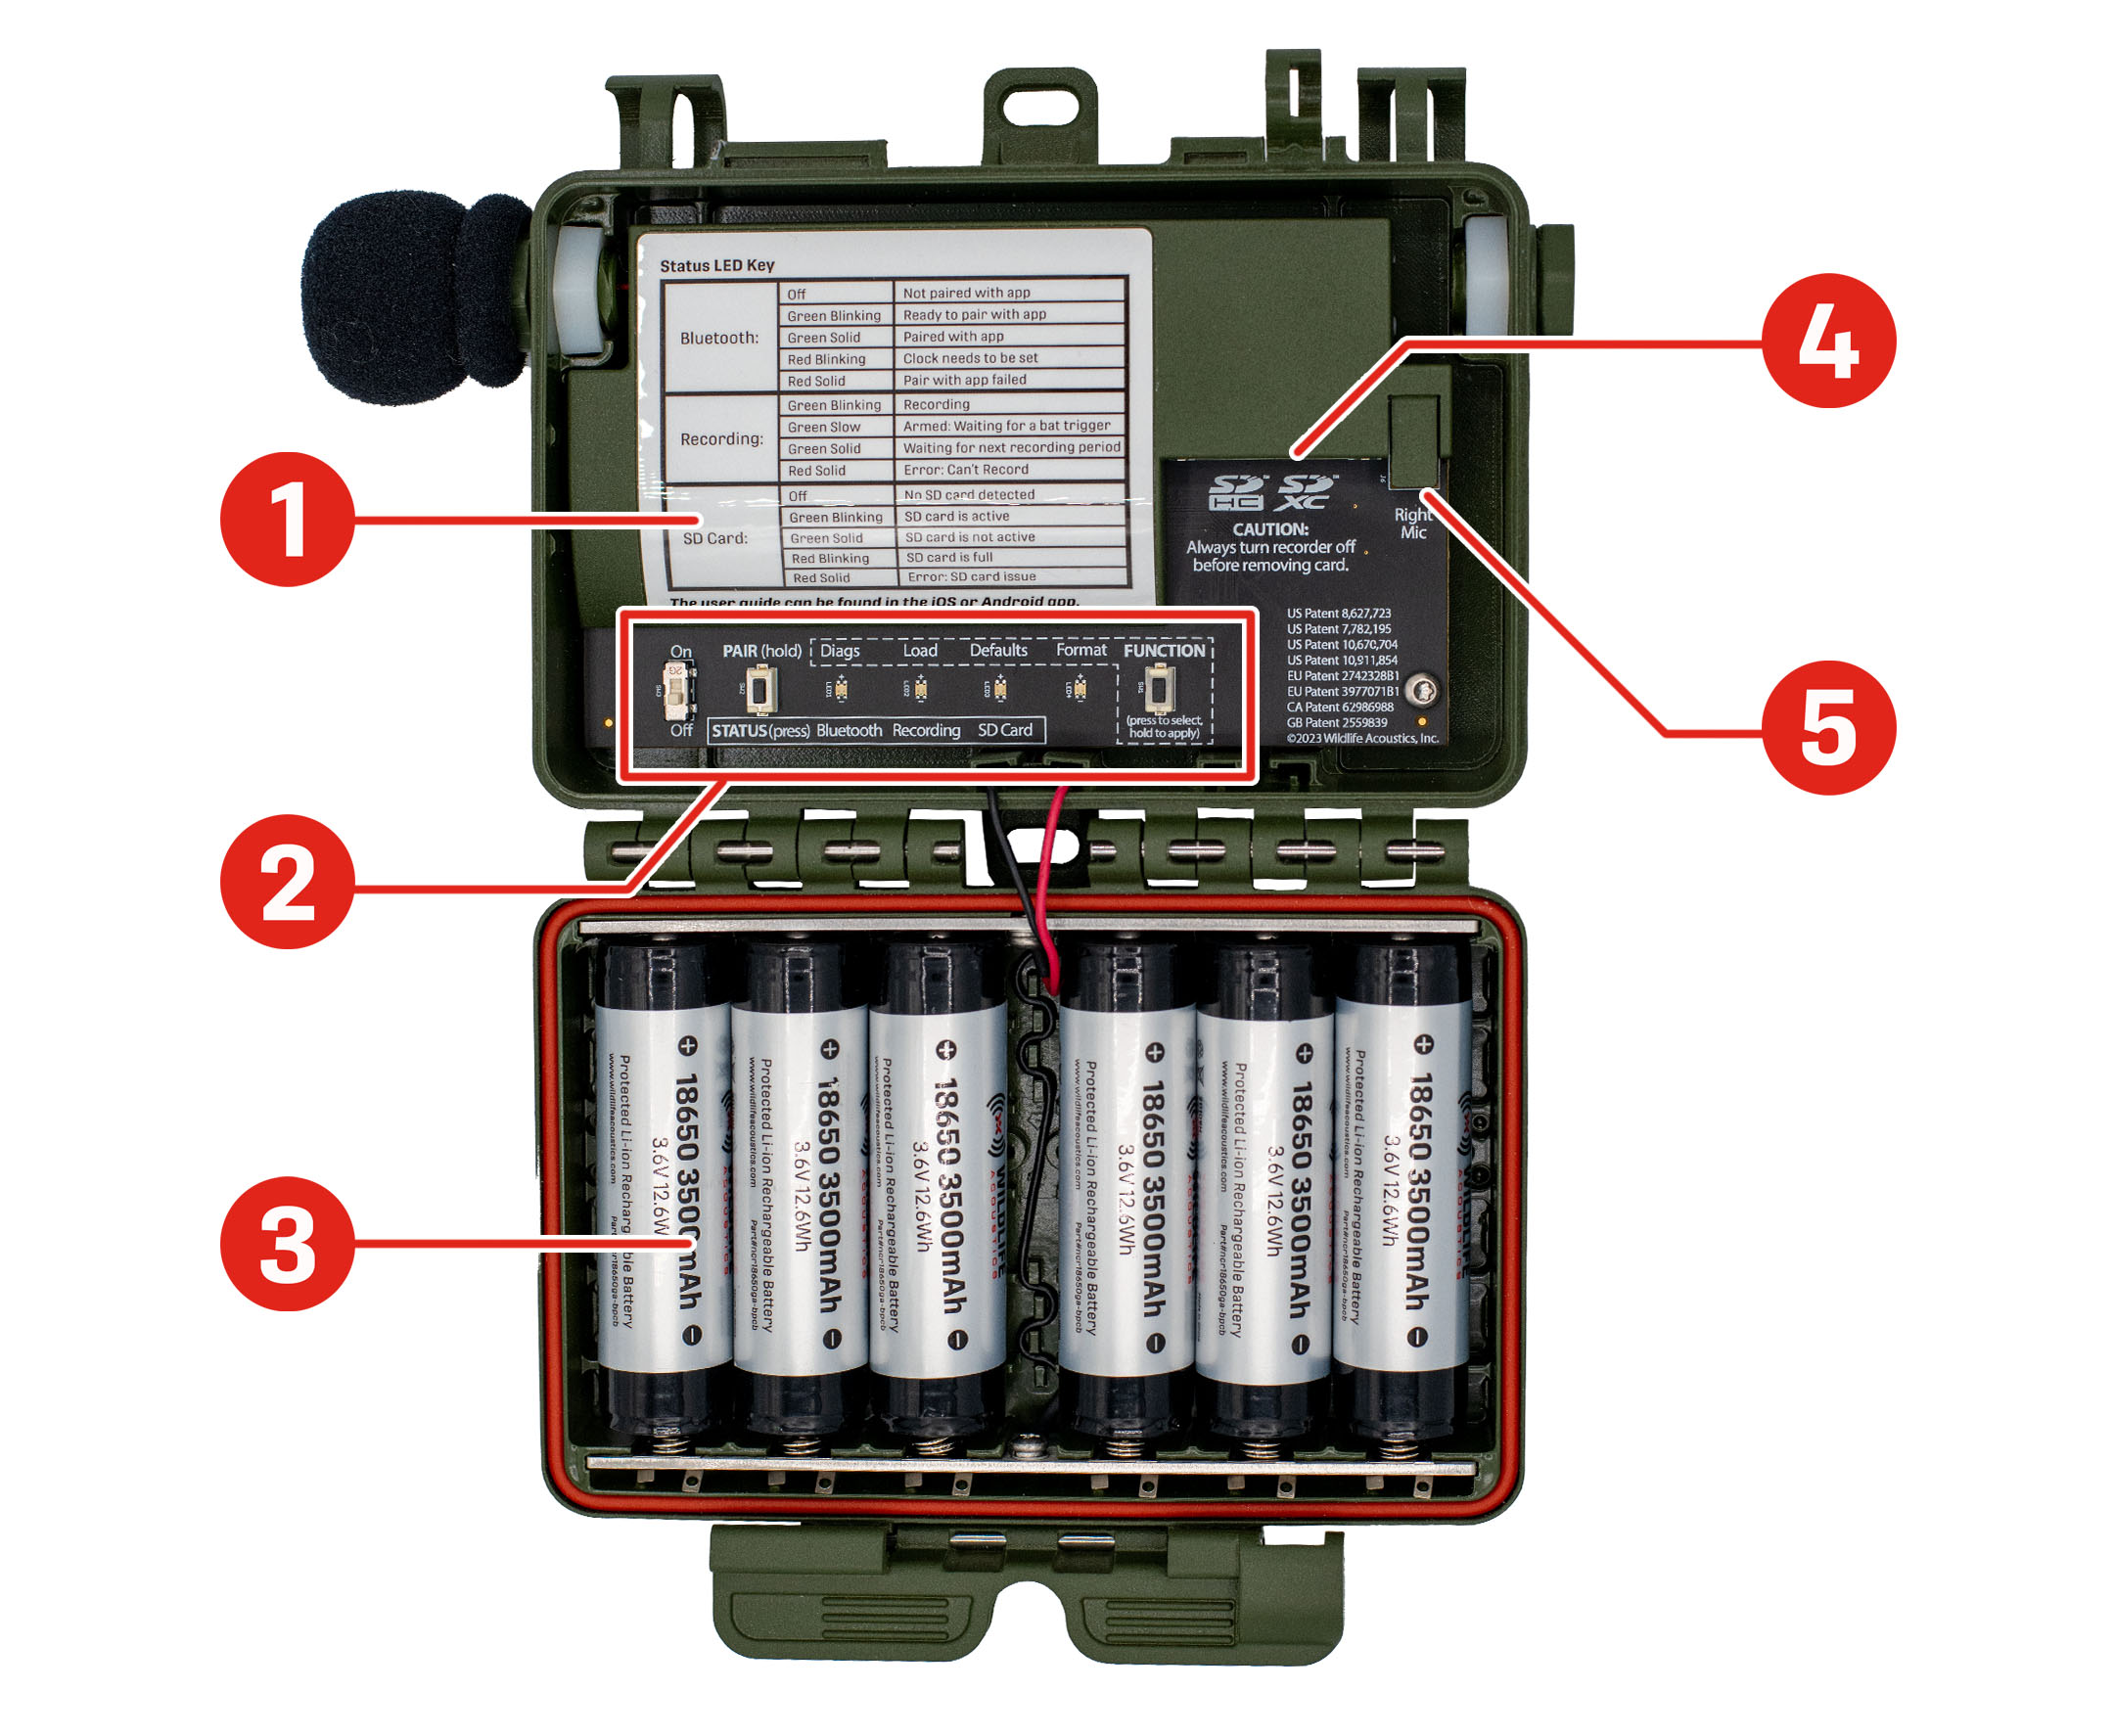
Internal Features
-
The Status LED Key provides a guide for understanding the STATUS LEDs. This table can also be found under STATUS LEDs.1
-
The Control Panel is where you'll find several basic, physical controls. See Control Panel for a detailed image of this section.
-
The Battery Compartment holds either AA or 18650 batteries, depending on the recorder version. See Battery Compartment.
-
The SD Card Slot holds a full-size SD card with a capacity up to 2 TB for storing recordings and other files.
-
The Right Microphone Connector (labeled Right Mic ) allows you to connect a second, acoustic microphone to the recorder. See Microphones.
Battery Compartment
The lid of the Song Meter Mini 2 holds the recorder's batteries. Depending on the version of the recorder, it holds either AA batteries or 18650 lithium-ion batteries.
AA Battery Compartment
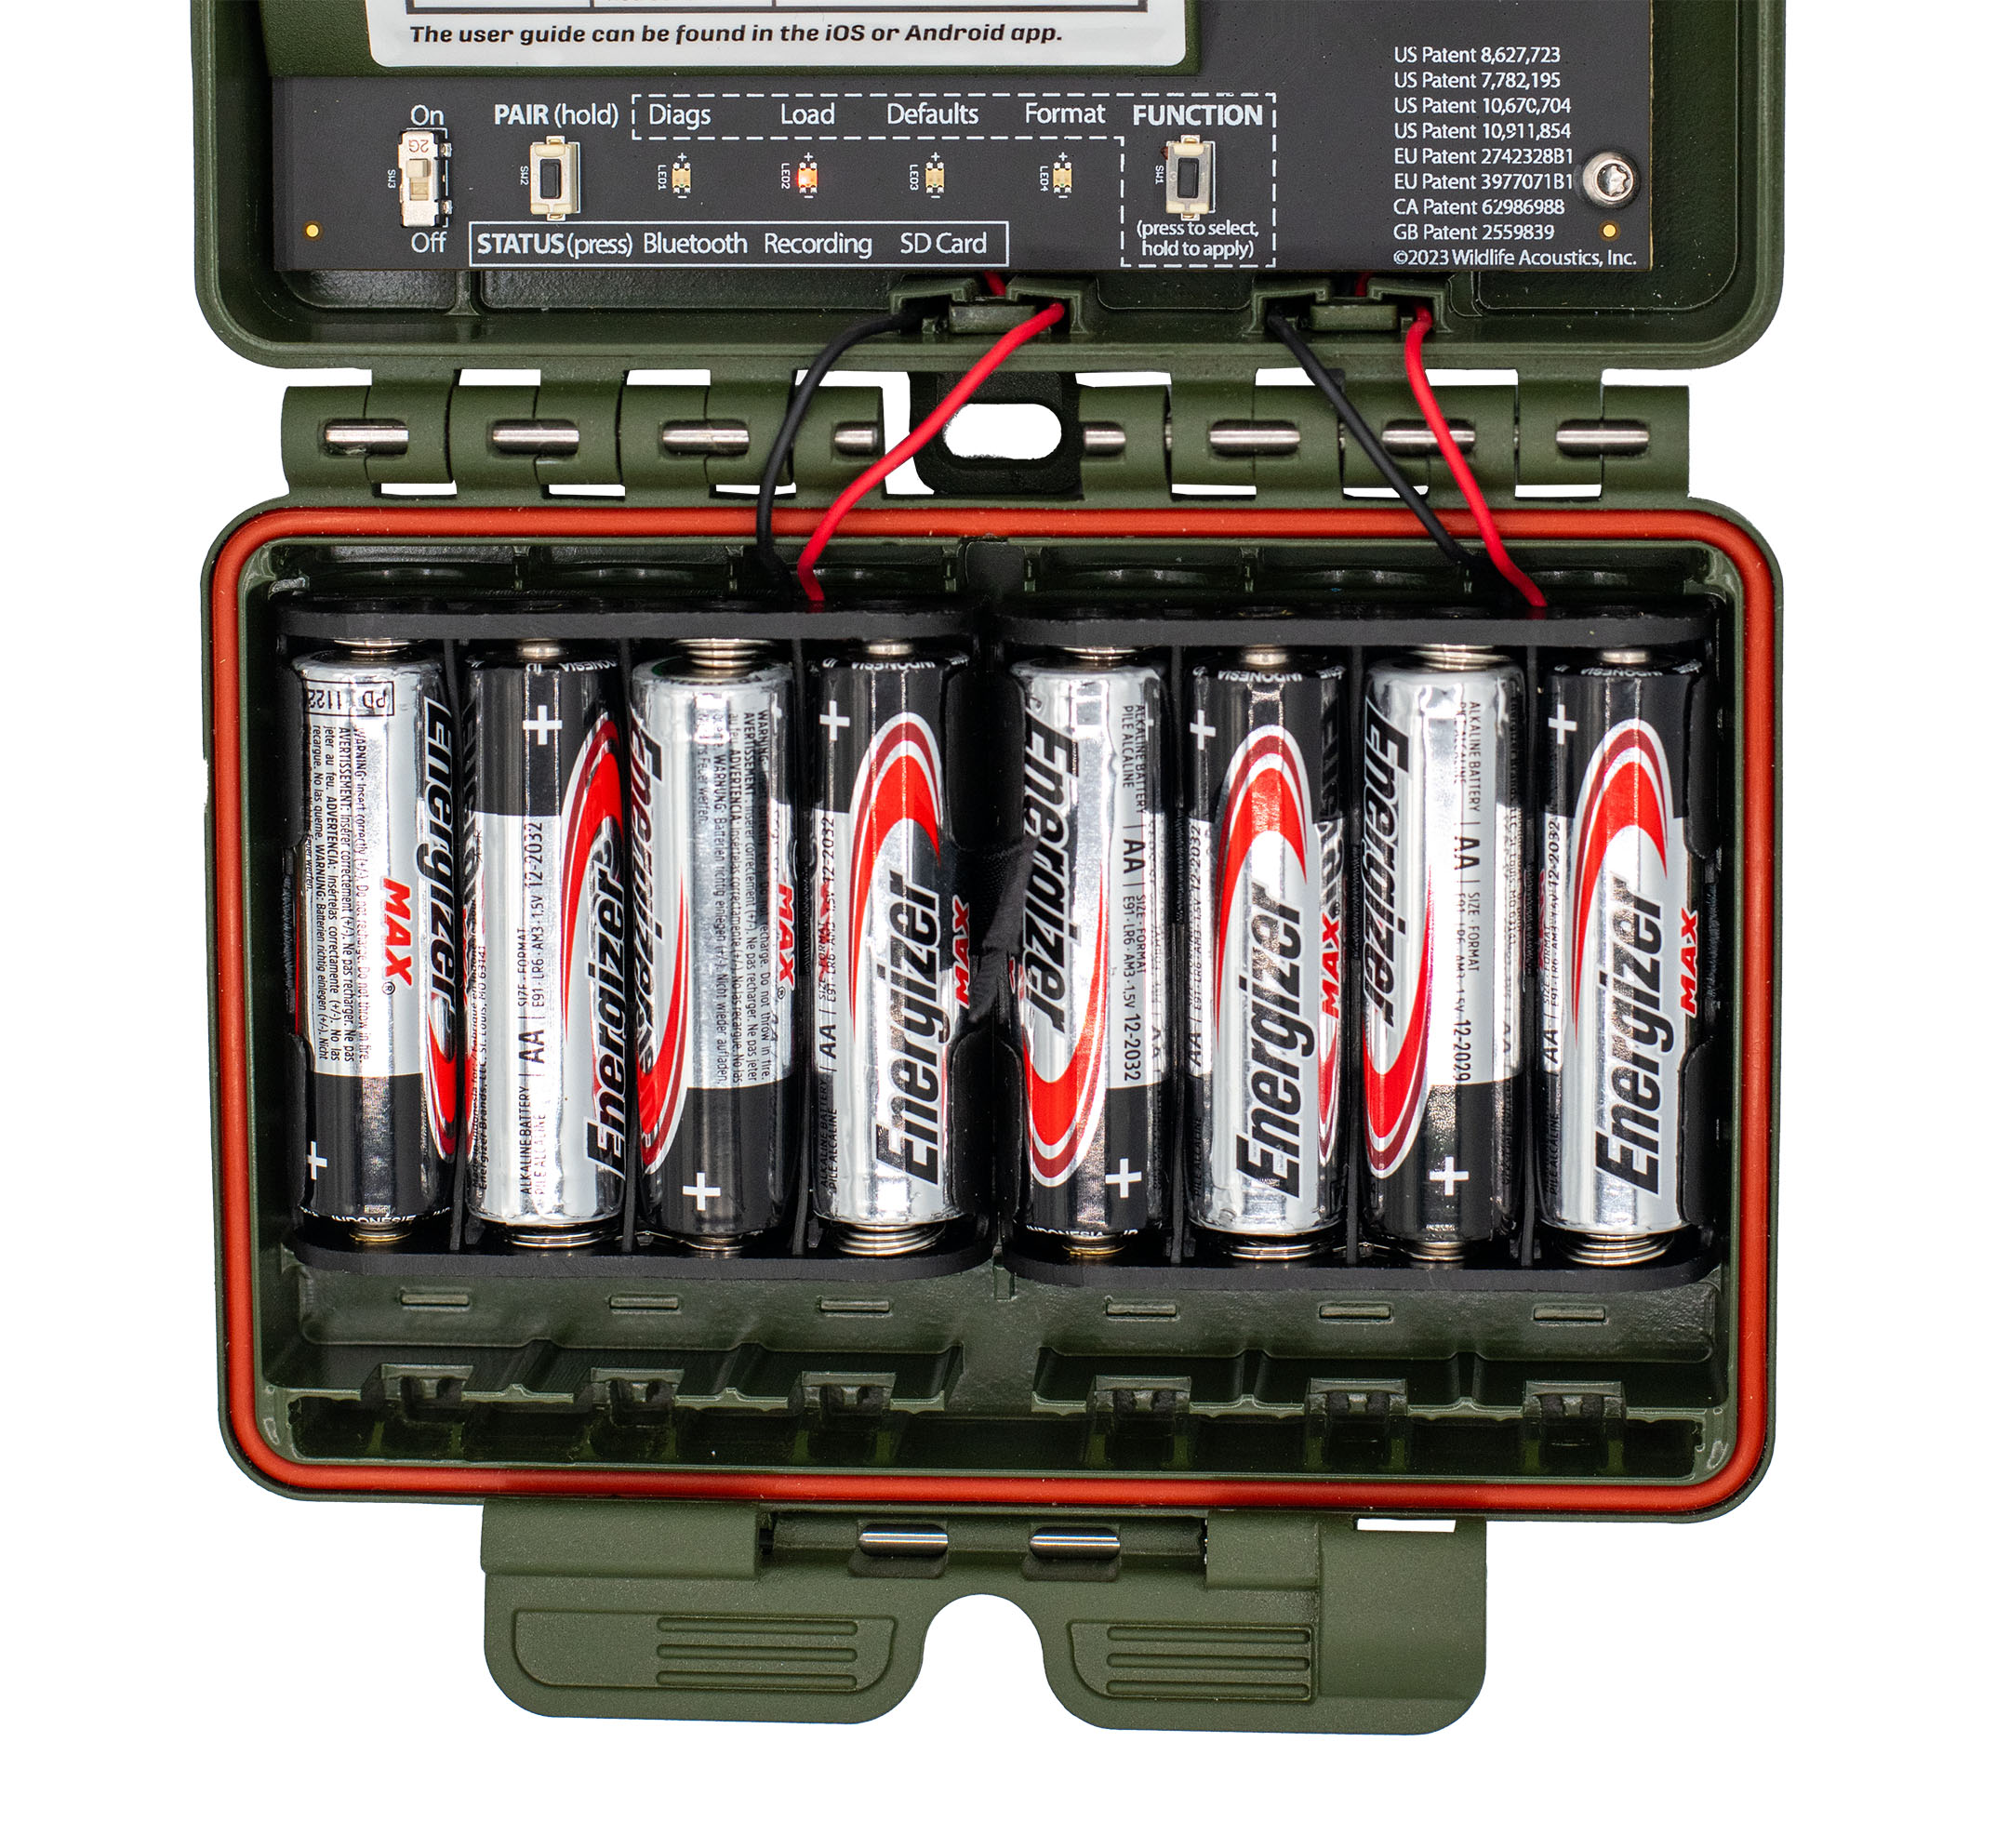
The AA battery compartment holds two plastic battery trays. Each tray holds four AA batteries, and you can power the recorder with four or eight AA batteries in total.
If you use only four AA batteries, all four must be installed in the same tray.
Each tray is equipped with a ribbon. When installing AA batteries, position the ribbon underneath the batteries. Pulling on the ribbon will then let you easily remove the batteries.
For information on the different types of AA batteries, including Energizer® Ultimate Lithium™, see Types of AA Batteries.
AA Battery Insertion Order
When inserting batteries, start near the attached end of each ribbon at the outer side of each tray and work towards the free end. This will ensure the ribbon has enough slack to make room for each battery. Without enough slack, the ribbon may push batteries out of the tray.
If only using four AA batteries, make sure the ribbon attached to the empty battery tray does not interfere with the seal between the lid and base of the recorder enclosure.
Best Practices for AA Batteries
Improper battery use can permanently damage your recorder. Always take care to follow these guidelines.
-
Do not mix new or freshly charged batteries with used or uncharged batteries. A single dead battery will prevent the entire set from functioning.
-
The recorder will lose power prematurely and may not power on at all.
-
Batteries may leak corrosive chemicals that can damage the recorder.
-
-
Do not mix multiple types of batteries (e.g. combining alkaline with NiMH). This applies even when using eight AA batteries. All eight batteries must be of the same type.
Ideally, all batteries should be of the same brand and model. Mixing batteries with different characteristics can produce unpredictable results.
-
Ensure batteries are oriented correctly. The negative, flat end of the battery should contact the battery tray spring.
If one AA battery out of eight is inserted backwards, the Song Meter Mini 2 may power on, but a backwards battery will eventually leak corrosive chemicals that can damage the recorder.
-
Ensure batteries are oriented with the correct positive/negative polarity.
Lithium-Ion Battery Compartment
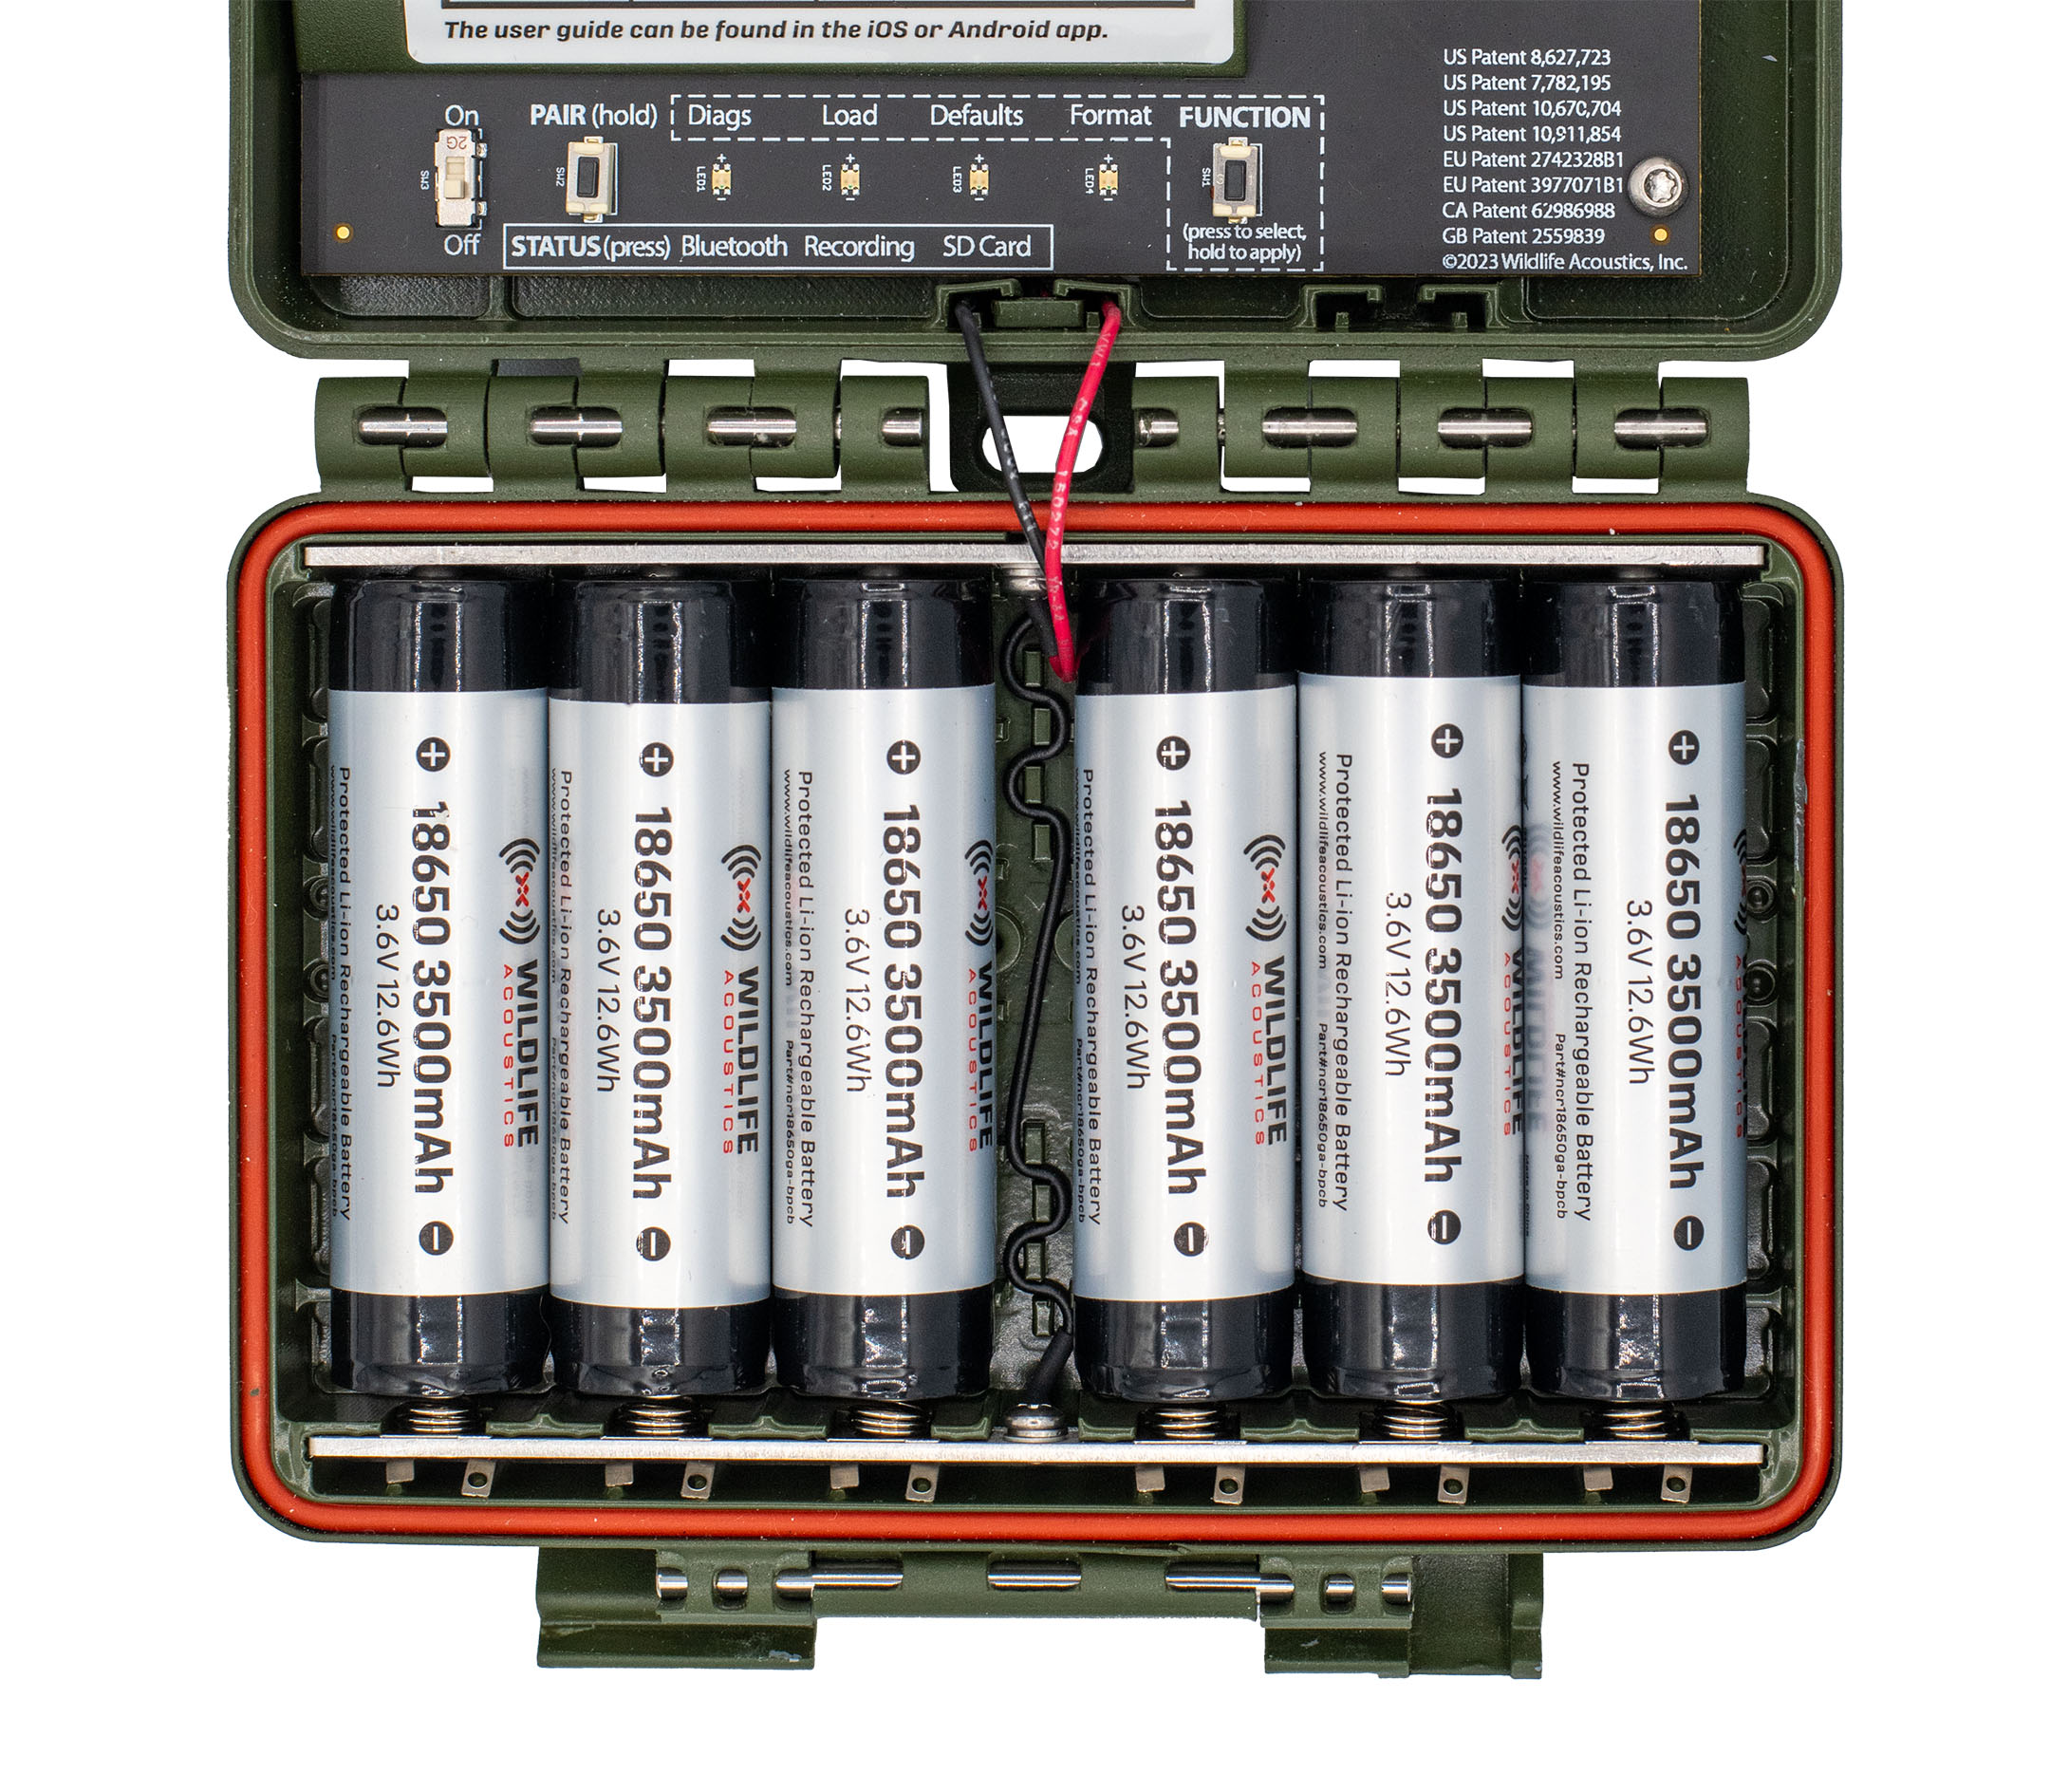
The lid of the Li-ion version of the Song Meter Mini 2 holds between one and six lithium-ion 18650 batteries. You can install any number of 18650 batteries in any of the slots, and the recorder will work as intended, but using more batteries provides longer run time. See Lithium-Ion Battery Requirements for more details on choosing appropriate batteries.
If using fewer than six lithium-ion batteries, we recommend inserting batteries starting from the left. Because the plastic cover with the Status LED Key contacts the four leftmost batteries when the enclosure is closed, those four battery slots are the most secure. When all six battery slots are filled, or when up to four batteries are installed in the leftmost slots, batteries are least likely to be shaken out of place by a strong impact.
Best Practices for Lithium-Ion Batteries
-
Do not allow batteries' electrical contacts to touch each other or any conductive material during transport or storage. Use a non-conductive storage container designed for 18650 batteries to prevent accidental contact.
-
Do not mix freshly charged batteries with drained batteries.
-
Unlike many rechargeable AA batteries, lithium-ion batteries are shipped with no stored charge. You must charge them before initial use.
-
Ensure batteries are oriented with the correct positive/negative polarity.
-
Remove batteries before long-term storage to avoid possible damage from battery leakage.
-
At the deployment site, make sure batteries were not knocked loose during travel.
There are strict regulations on shipping and traveling with lithium-ion batteries in many parts of the world. Consult applicable laws before air travel or when planning to ship lithium-ion batteries.
SD Card Slot
The Song Meter Mini 2 recorder saves recording files and a summary log to an SD card installed in the memory card slot.
To insert an SD card, slide it into the SD Card Slot until it clicks into place. To remove, gently press the card further into the slot until it clicks again, and let the internal spring mechanism eject the card.
-
Only remove the SD card after setting the power switch to OFF and waiting until all Status LEDs have turned off.
-
Use the Song Meter Configurator app to check recording space available on the SD card.
Wildlife Acoustics recommends the SanDisk® brand of SD cards for their superior performance. Kingston® and PNY® are also suitable.
Be sure the card’s write-protection switch is set to the unlocked position. The Song Meter Mini 2 recorder will not record to a write-protected card.
Control Panel

-
The ON/OFF switch powers the recorder on or sets it to a low-power, idle state. See ON/OFF Switch.
-
The PAIR/STATUS button serves two functions:
-
Press and hold the button to initiate pairing with the Song Meter Configurator app. See Pair the Recorder with the Song Meter Configurator App.
-
Press the button briefly to activate the STATUS LEDs. See STATUS LEDs.
-
-
The FUNCTION/STATUS LEDs serve two purposes:
-
When using the FUNCTION button, the LEDs provide feedback about the selected function. See Function Button and LEDs.
-
The LEDs can also provide general status information (see STATUS LEDs).
-
-
The FUNCTION button can be used to select and initiate four functions (see Function Button and LEDs).
ON/OFF Switch
-
ON (up position): Full power is enabled. Schedule is started.
-
OFF (down position): The recorder enters a low-power idle state. Schedule is stopped.
When the Song Meter Mini 2 recorder is first powered on, the STATUS LEDs show Bluetooth, Recording, and SD Card status. If the recorder is unpaired and its buttons are not touched for one minute, the LEDs will turn off.
When the Song Meter Mini 2 recorder is switched off, it goes through a routine to end and save any current recording. This can take a few seconds.
This process means it is safe to set the switch to OFF at any time.
STATUS LEDs
The three STATUS LEDs on the recorder provide Bluetooth, Recording, and SD Card information.
The STATUS LEDs remain active while the recorder is paired with the Song Meter Configurator app.
The table of STATUS LEDs definitions, below, is also printed inside the enclosure, just above the STATUS LEDs.
|
LED Label |
LED Activity |
Status Meaning |
|---|---|---|
|
Bluetooth |
Off |
Not paired with the Song Meter Configurator app |
|
Green Blinking |
Ready to pair with the Song Meter Configurator app |
|
|
Green Solid |
Paired with the Song Meter Configurator app |
|
|
Red Blinking |
Clock needs to be set |
|
|
Red Solid |
Pairing failed |
|
|
Recording |
Green Blinking |
Recording |
|
Green Solid |
Waiting for next recording period |
|
|
Red Solid |
Error: Cannot record |
|
|
SD Card |
Off |
No SD card is detected |
|
Green Blinking |
SD Card is active: do not eject |
|
|
Green Solid |
SD Card is inactive: safe to eject |
|
|
Red Blinking |
SD Card is full |
|
|
Red Solid |
Error: SD Card issue |
Function Button and LEDs
The physical controls on the Song Meter Mini 2 allow you to perform four utility functions without the Song Meter Configurator app. Instructions on performing these utility functions using the physical controls and using the Song Meter Configurator app can be found elsewhere in this documentation.
Available Functions
There are four FUNCTION LEDs:
-
Diags: This runs an internal diagnostic check, then saves a diagnostics file and a configuration file to the SD card.
See Export Diagnostics Files for instructions on exporting diagnostic files using the FUNCTION button or the Song Meter Configurator app.
See Diagnostics Files for a description of what diagnostics files are and when they are useful.
-
Load: This loads a configuration file (ending in .miniconfig) and/or firmware file (ending in .smm) from the SD card to the recorder.
For detailed instructions on installing a firmware file, see Update the Recorder's Firmware.
For detailed instructions on loading a configuration file, see Configure a Recorder Using a Configuration File.
Note:Once a configuration file or firmware file is successfully loaded from an SD card, that information is stored on the Song Meter Mini 2's internal memory, and the file is no longer needed on the SD card.
-
Defaults: This restores the default states of all of the recorder's settings except current date and time.
See Restore Recorder to Factory Defaults for instructions on restoring default settings using the FUNCTION button or the Song Meter Configurator app.
-
Format: This reformats the SD card, resetting it to a blank state and deleting any existing files from the card.
This function can also be performed using the Song Meter Configurator app or free desktop software. See Format the SD Card.
Important:It is important to reformat the SD card prior to each deployment. Reformatting the card goes beyond just deleting existing data. It resets the structure of the card and reduces the likelihood of data corruption.
Reformatting can be done using the Song Meter Mini 2 or using the SD Association's official, free formatting utility for Windows and Mac.
Perform a Function Using the FUNCTION Button
Procedure
-
Tap the FUNCTION button multiple times.
A green LED will cycle through the four positions to highlight the selected function.
- When the desired function is highlighted, press and hold the FUNCTION button for three seconds.
- When the highlighted LED starts flashing green, let go of the FUNCTION button.
Results
If all four LEDs flash green three times, the function ran successfully.
If all four LEDs flash red six times, the function was unsuccessful.
Note that the printed key includes one entry that only applies to the Song Meter Mini Bat 1 and 2 recorders, "Armed: Waiting for a bat trigger."